
کالای فیزیکی


کالای فیزیکی
PiStorm32 for Amiga 1200
۵۷٫۰۰۰٫۰۰۰تومان
۵۷٫۰۰۰٫۰۰۰
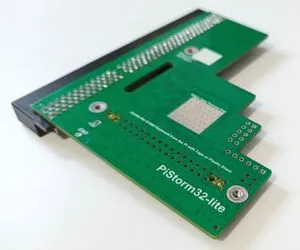
The PiStorm32 is an accelerator for the Commodore Amiga 1200 computer
It has been created by Claude Schwarz
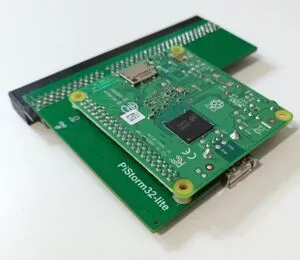
This speeds up the Amiga 1200 by leveraging the Raspberry Pi’s computational power. The Raspberry Pi plugs into the PiStorm and emulates the native 680×0 CPU at much higher performance than the original CPU
The Raspberry Pi is running software emulation of the 680×0 CPU using Emu68 developed by Michal Schulz
Description
The package include a set of PiStorm32, accessories and a 32GB microSD card (pre-installed EMU68 system, the package does not include the Workbench system or system ROMs which you need to buy and download by your own). We assemble the adapters at our company on our SMT line with attention to quality
Package Includes
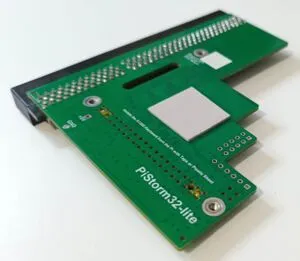
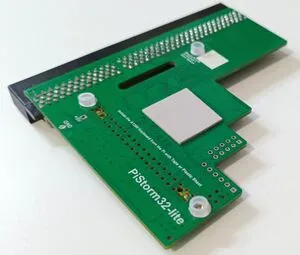
PiStorm32 board
Accessories (3x bolts, 3x spacers, 1x thermal pad)
32GB MicroSD card
Compatiblity
To use the PiStorm32-Lite you will require
Commodore Amiga 1200 (or Escom Amiga Technologies 1200)
Raspberry Pi
Zero 2w
Model 3 A+ > RECOMMENDED
Model 3 B
Model 4 > Reported some inconsistencies, not recommended
MicroSD card (recommended 32GB)
IMPORTANT
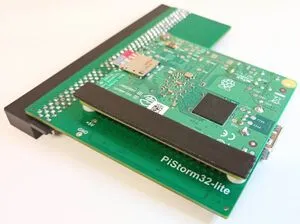
Covering the exposed GPIO pins on the PiStorm32-Lite board with the insulation strip is critical (see step 6 photograph). This prevents the pins shorting against the metal backplate of the Amiga 1200 keyboard
Amiga 1200 Installation
1 Power down the Amiga and monitor. Unplug all cables from the Amiga
2 Anti-statically discharge yourself before handling the device. It is recommended to use an E.S.D. wrist strap for the installation process (such as Amiga Kit product code TLSASW001)
3 Turn over the Amiga and remove the plastic trap door cover by using a small coin/flat blade screw driver to gently lever open the plastic latch
4 Align the memory expansion’s 150-pin expansion connector with the gold contacts on the motherboard and push it on until fully in place. Do not push the expansion onto the motherboard’s gold contact at an angle as this could bend or damage the pins in the connector. If the metal upper RF shielding is obstructing the installation of the card, then it may need to be gently bent upwards. It can also be loosened by opening the computer and loosing the securing screw
5 Replace trap door cover, turn over, connect all cables and power on
Software Installation and Configuration
There are two ways you can setup software. First being the quick method to test card is working. The second being a more involved process to enable use of extra space on SD card, as Hard Disk Drives
Quick Method
1) Take your SD card (preferably 32GB) and format it as FAT32
2) Goto https://github.com/michalsc/Emu68/releases/tag/nightly and download latest available for PiStorm32-Lite. It will start with Emu68-pistorm32lite-. Current file as of writing this is, Emu68-pistorm32lite-20230124-ebe92e.zip
3) Once downloaded, extract contents to the root of the SD card
4) Open root of SD card copy across a valid kickstart file across (i.e. Kickstart 3.1) and rename it kick.rom
5) Finally, insert SD card into Raspberry Pi. Once turned on, it should boot to Kickstart 3.1 screen (unless you have an HDD, else it will boot that). You can use official Kickstarts or Custom made roms
NOTE
Do not do as config text says, in regards to adding firmware before kick.rom. Doing this causes Lite to load firmware twice and machine will hang on blank screen
More Involved Method
1) Take your SD card, however this time we are going to clean it and partition it
2) Open Command Prompt as Administrator, if using Windows (else use what ever partitioning software your happy with)
3) In command prompt type diskpart and press return (enter)
4) In diskpart type list disk and press return (enter). It will list all drives attached to your machine
NOTE
DiskPart is a dangerous tool if you select wrong drive, as it will list your boot drives. Make sure you select the correct device
5) Look at list and select correct drive by size and then type select disk y (y being number of drive listed in list disk) and press return (enter)
6) Once your sure you have correct drive selected (you can check with list disk, it will put and * next to drive selected), type clean and press return (enter). This will completely blank the SD card
7) Check SD card is still selected, by using list disk command again (you will also notice, free and total space will be same)
8) Now type create partition pri size=512 and press return (enter). This partition will be our PS32-Lite FAT32 software partition. It doesn’t need to be massive, so 512MB should surfice. 9) Next you need to decide on drive sizes for rest of card. As any extra partitions created will be seen as separate drives. So you could create 1 partition using rest of card and then partition that in AmigaOS, like a real HDD. For this guide we will create 3 extra partitions
10) Now type create partition pri size=512 id=76 and press return (enter). This can be our system drive in AmigaOS
11) Then type create partition pri size=512 id=76 and press return (enter). This can be our Work
drive in AmigaOS
12) Finally type create partition pri id=76 and press return (enter). Notice we do not specify a size, this will use the rest of the SD card. This can be our Games drive in AmigaOS
13) Now we need to assign partition 1, so it will mount as a drive in windows. Type select partition 1 and press return (enter). Then type assign and press return (enter). Then type exit and press return (enter)
14) You can now close the command prompt window
NOTE
To use partitions we just setup as drive in AmigaOS. You will need to change the HDToolBox tooltype line. Change from SCSI_DEVICE_NAME=scsi.device to SCSI_DEVICE_NAME=brcm-sdhc.device. When you run HDToolBox, ignore the disk marked as 0, as that’s our Pi software partition. Set up disk 1,2 and 3 as you normally would a HDD
15) Copy PS32-Lite files across as described in Quick Method
YOU CAN DO THINGS LIKE
PLAYBACK
MPG VIDEO FILES
AVI VIDEO FILES
MASSIVE MUSIC MOD COLLECTION
BEST NEW AMIGA GAMES RTG / AGA / OCS
MP3s AUDIO files
RUN ATARI ST GAMES
RUN COMMODORE 64 GAMES & SOFTWARE
RUN ZX SPECTURM GAME & SOFTWARE
RUN SHAPESHIFTER FOR MAC
RUN MS DOS Games
RUN MAME AND ARCADE ROMS IN FULL COLOUR
RUN WHDLOAD GAMES
HI COLOUR WORKBENCH
PLAY MPG VIDEOS AND MP3 AUDIO
ATARI ST EMULATOR
RUN SNES
RUN NEOGEO
Hardware Installation
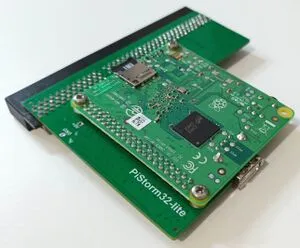
Raspberry Pi Installation
Please follow the following steps for mounting and securing your Raspberry Pi on the PiStorm32-Lite
توجه داشته باشید پس از سفارش و هماهنگی های مربوطه 3ماه کاری طول
می کشد تا سفارش شما ساخته و به دستتان برسد
فروشگاه ساخته شده با سازیتو